
A Detailed Guide on Faking Your Location in Mozilla Firefox On Infinix GT 10 Pro | Dr.fone
A Detailed Guide on Faking Your Location in Mozilla Firefox On Infinix GT 10 Pro
Mozilla Firefox is one of the most famous browsers known for its security. Like other browsers, it also tracks your location and shares it with websites. Although Firefox asks for your permission before sharing your location, it can still be a privacy concern for many people. For many reasons, disabling your location is disadvantageous, so Firefox spoof location can resolve your concerns.
It is not hard to change or spoof your location in Mozilla Firefox. Stick with this article to learn different ways to fake a location in Firefox on devices.

Part 1: Preparations Before Spoofing Your Location in Firefox
Before starting with Firefox location spoof, you must be aware of how the platform and websites determine your location. There are many ways a browser can detect your location. It includes services like IP addresses, GPS tracking, Wi-Fi, and Bluetooth. The main tool browsers and websites use to determine your location is HTML5 Geolocation API.
1. Basic Understanding of the HTML5 Geolocation API
Basically, a browser API called HTML5 Geolocation API is used by websites and browsers to detect a user’s location using longitude and latitude coordinates. It is strictly based on user permissions for detecting location. That means you will receive a permission prompt whenever a website or browser uses it to detect your location. If you refuse the permission, they can’t use this API for location determination.
2. How Does HTML5 Geolocation Work?
HTML5 Geolocation determines your location using the longitude and latitude coordinates with the help of GPS. If your device doesn’t have GPS tracking, it uses Wi-Fi and cell tower signals to detect the Infinix GT 10 Pro device’s location. The location detected by HTML5 Geolocation is highly accurate with accuracy up to street level. Due to its high precision in locating users, it can create privacy issues for users.
Part 2: How to Fake Your Location in Mozilla Firefox on Computers
Many ways are available for you to fake or disable your desktop location in Mozilla Firefox to address your privacy concerns. You can either disable or change the location in the browser or use a third-party app or extension. Below, we have explained the three most common ways to fake or disable your location in Firefox.
Method 1: Disable Geolocation in Firefox
If you want to stop websites from accessing your location from Mozilla Firefox, you can disable the geolocation feature using Firefox Settings. The process to disable your location in Mozilla Firefox is covered using these steps:
Step 1: Open Mozilla Firefox on your computer to disable its location. Click the “Three Vertical Bars” icon to select “Settings.” Now, tap “Privacy & Security” from the left sidebar and navigate to “Permissions.”

Step 2: Click “Settings” in front of “Location” to manage the location settings. It will open a window with a list of all the websites that can access your location. Depending on your needs, you can choose between “Remove Web Site” or “Remove All Web Sites” to remove their location access.

Step 3: If you want to block the websites from accessing your location indefinitely, you can select the “Block new requests asking to access your location” option. Once selected, click “Save Changes” to disable your geolocation on Firefox.


Method 2: Manually Change Your Firefox Location
Disabling your location on Mozilla Firefox can stop websites from accessing your location. It also means websites with location-based services will no longer work. That’s why it is better to spoof the location on Firefox rather than disabling it. Firefox allows you to manually change your location using its advanced settings. The steps required for this process are given below:
Step 1: Once Mozilla Firefox is open, type “about:config” and press Enter. You will see a warning screen as you modify advanced settings. You have to click on the “Accept the Risk and Continue” button to proceed further.

Step 2: First search for “Geo.enabled,” and when it appears, toggle its value from “True” to “False” to disable geolocation. To spoof your location, search for “geo.provider.network.url” and press the “Pen” icon to edit it.

Step 3: You can enter your desired location using its latitude and longitude coordinates. The format to enter your location coordinates should be:
“data:application/json,{“location”: {“lat”: LATITUDE VALUE, “lng”: LONGITUDE VALUE}, “accuracy”: 27000.0}.”
Once done, your geolocation will be changed to your desired location.

Method 3: Use The Location Guard Firefox Extension
Another way you can protect your location from websites is to use the “Location Guard “ add-on in Mozilla Firefox. It is generally recognized as an extension, also available in the Add-Ons Store of Firefox. The steps to add “Location Guard” and use it to alter your location are following:
Step 1: Click on the “Three Vertical Bars” icon from the top left corner of your Firefox and select “Add-ons and themes.” Tap “Extensions” from the left sidebar and search for “Location Guard” in the Add-Ons Store. Once located, click “Add to Firefox” to add it to your browser.

Step 2: You can choose between two options to protect your location’s privacy. Using the “Privacy Levels” option, you can select a privacy level and location range to add noise when a website tries to locate you. It stops websites from detecting your accurate location, though they can still locate the general area.

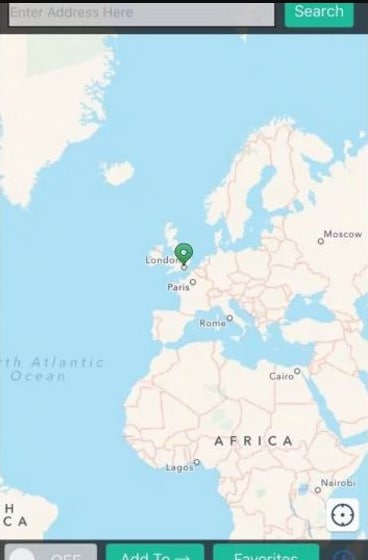
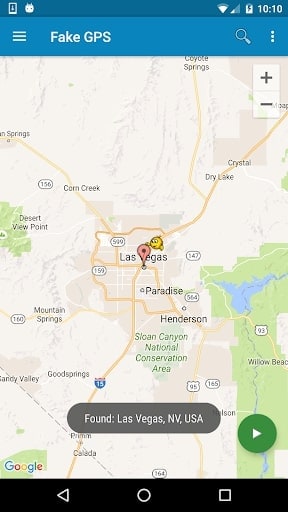
Step 3: Using its “Fixed Location” feature from the left sidebar, you can change your location. Here, select any location from the map by placing the “Marker” on it to change your browser’s location.

Part 3: How to Fake Your Location in Mozilla Firefox on Phones
It is not only on computers where you can use Firefox fake location but also on smartphones. You can easily disable or change your Firefox location on your iOS or Android device. Three different methods to disable or change the location in Mozilla Firefox are summarized below:
Method 1: Disable Geolocation Sharing on the Firefox Browser
If you use the Firefox browser on your phone, it allows you to disable your location using a couple of simple steps. Disabling location services for the Firefox browser differs on Android and iOS devices. A detailed step-by-step process for disabling location is given below for both platforms:
On Android
Step 1: Open the Firefox browser on your phone and press the “Three Dots” icon from the bottom right corner. Select “Settings” from the menu and navigate to the “Privacy and Security” section.
Step 2: Now, tap “Site Permissions” and select “Location.” In the “Location” option, select “Blocked” to disable the location access on the Firefox browser.

On iPhone
Step 1: On your iPhone, open “Settings” and scroll down to “Firefox.” After locating the app, select it and press “Location” on the next screen.

Step 2: In the “Location” menu, you can select “Never” to completely disable the location access for the Firefox browser. To only stop Firefox from detecting your accurate location, turn off the toggle of the “Precise Location” option.

Method 2: Spoof Your Location in Firefox Using Dr.Fone - Virtual Location
Nowadays, many websites work with the help of location-based services. Disabling geolocation from the Firefox browser means they won’t work. It means you need a tool that can change your Firefox location without affecting your favorite platforms.
Wondershare Dr.Fone - Virtual Location provides you with an excellent way to do Firefox location spoofing. You will not have to worry about websites or apps detecting your location as fake when using this tool.
Dr.Fone - Virtual Location
1-Click Location Changer for both iOS and Android
- Teleport from one location to another across the world from the comfort of your home.
- With just a few selections on your computer, you can make members of your circle believe you’re anywhere you want.
- Stimulate and imitate movement and set the speed and stops you take along the way.
- Compatible with both iOS and Android systems.
- Work with location-based apps, like Pokemon Go , Snapchat , Instagram , Facebook , etc.
3981454 people have downloaded it
Main Features of Dr.Fone - Virtual Location
- Dr.Fone - Virtual Location allows you to play location-based games. It includes games like Pokémon Go, Minecraft Earth, and Jurassic World Alive, all from the comfort of your bed.
- If you use a dating app like Tinder or Bumble, you can increase your likes and matches using this tool.
- You can bypass the geo-restriction of apps and enjoy their content with the tool’s help.
Steps Required for Spoofing Location in Firefox via Dr.Fone - Virtual Location
Using Dr.Fone- Virtual Location to spoof your location in Mozilla Firefox is simple and quick. You will need to install Dr.Fone on your computer and follow these steps for location spoofing:
Step 1: Install Dr.Fone on Your System
Download and install Dr.Fone on your computer and connect your phone to it. Access Dr.Fone, select “Virtual Location,” and click “Get Started” on the next screen to begin the process.

Step 2: Activate the Teleport Mode on Dr.Fone
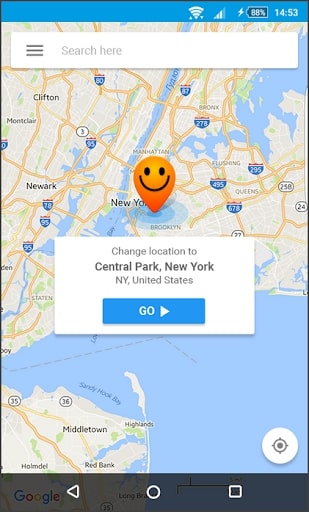
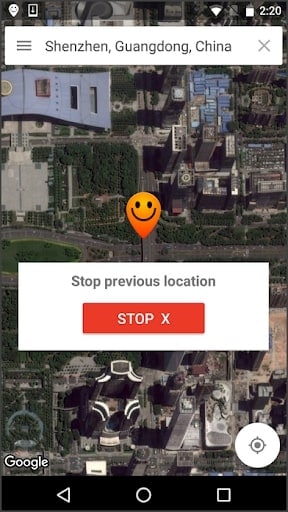
After clicking “Get Started, “ a map will open where you must select your original location. It can be done using the “Center On” icon from the right sidebar. To choose your fake location, you will need to activate “Teleport Mode” from the top right corner.

Step 3: Spoof Your Location in Firefox
Enter your desired fake location in the provided space and press “Go” once the mode is activated. It will take you to the entered location, where you need to select “Move Here” to complete the process. You can confirm the location spoof by opening any location-based app on your phone.

Method 3: Change Your Location in Firefox Using ExpressVPN
Browsers like Mozilla Firefox tracks your location by using your IP address. You can use a VPN to spoof your IP location to protect your actual location from websites. ExpressVPN is a VPN that is available for both Android and iOS devices. You can use these steps to change your location using ExpressVPN:
Step 1: Install ExpressVPN on your phone and create an account for it. If you are already a user of ExpressVPN, then log in with your account.
Step 2: Select your desired fake location from the “Smart Location” tab after logging in. Once a location is selected, press “Connect” to change to the desired fake location.

Conclusion
In today’s digital world, you have to compromise your privacy to some extent. However, it doesn’t mean that you should not try to use tools available to you to protect your privacy to the limit. Dr.Fone - Virtual Location solves your concerns regarding location sharing with ease. With this tool, you can fake location in Firefox and still enjoy all the features and services offered by location-based websites and apps.
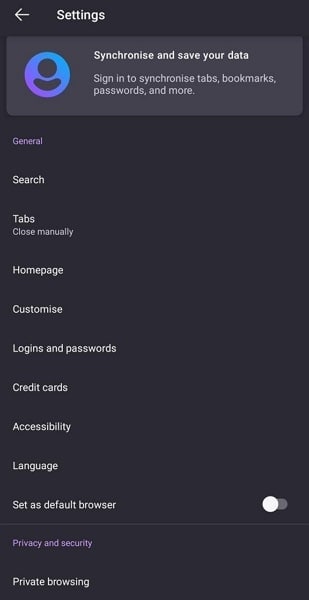
Prevent Cross-Site Tracking on Infinix GT 10 Pro and Browser
Have you ever wondered why you get the advertisements of the websites you visited a few minutes ago on your social media sites? Here comes to Cross-Site Tracking, also termed CST, and it is a process where third-party cookies and sites track your browser history.
![]()
The CST process is like invading your privacy by collecting your browser history and personal information. So, to prevent these services, there are several ways by which you can cross-site tracking on your system as well as Infinix GT 10 Pro phone browsers. Keep reading to learn how to stop cross-site tracking on both Infinix GT 10 Pro and browser.
Part 1: Why Do We Need to Stop Cross-site Tracking?
Cross-site Tracking is all about collecting your browsing data and other information for advertising purposes. Though the process can prove convenient for many as it provides additional information about the products and services you have searched for and offers tailor-made content, it is intrusive and about breaching your privacy.
Cross-site tracking collects information about your browsing history. The third-party cookies also monitor the content type you have visited and your personal information, which is risky.
Besides invading privacy, the CST also poses several other issues. Based on your browsing history, additional content you have not asked for is loaded on your visited sites, slows down the page loading process, and puts an extra burden on your battery. Moreover, too much-unwanted content can interfere with the basic information you are looking for.
So, it is always better to prevent cross-site tracking for all the above and more reasons.
Further reading: A detailed guide on faking location in Mozilla Firefox . Don’t worry about your location privacy anymore!
Part 2: Can Private Browsing be traced?
Yes, private browsing can be traced. When you work in private browsing mode, the web browser does not save the browsing history, which means that anyone who uses your system will not check your online activities. But websites and cookies can track your browsing history as well as other information.
Part 3: How to Disable Cross-website Tracking on Safari for iOS Devices?
Safari is the most commonly used platform by iOS users. So, to prevent CST for Safari on your iOS devices and Mac systems, below is a complete guide.
Deactivate Safari cross-website tracking for iPhone & iPad
Safari cross-site tracking can be prevented using the below steps on your iPhone and iPad.
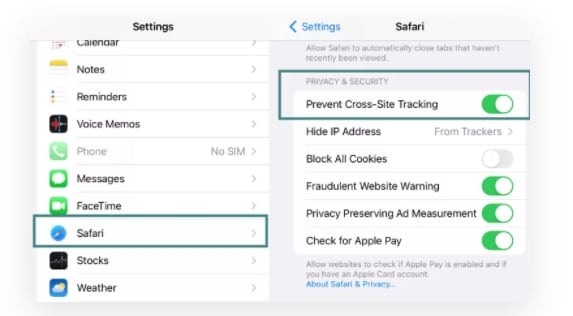
- Step 1. Launch the Settings app on your iOS device.
- Step 2. Find the Safari option by scrolling down the menu.
- Step 3. Move the slider to turn on “Prevent Cross-Site Tracking” under the PRIVACY & SECURITY option.
Deactivate Safari cross-website tracking for Mac
Use the steps below to turn off cross-site tracking on Safari on your Mac systems.
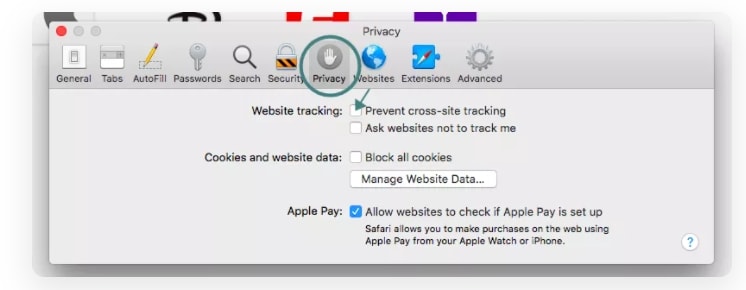
- Step 1. On your Mac system, open the Safari app.
- Step 2. Move to Safari > Preferences > Privacy
- Step 3. Enable the “Prevent cross tracking” option by clicking on the box next to it.
Part 4: How to Disable Cross-site Tracking on Google Chrome
Chrome is used widely on Windows systems and Android devices, and to prevent the CST from your browser, a detailed guide is given below.
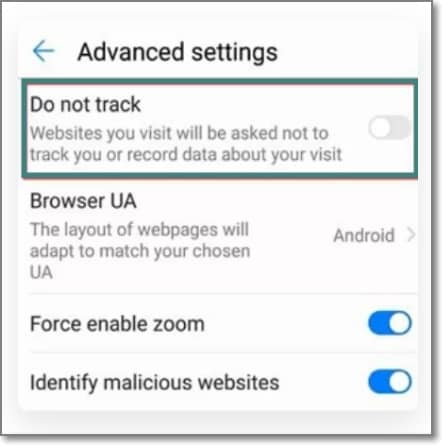
Enable “Do Not Track” on Google Chrome for Android
- Step 1. On your Infinix GT 10 Pro, open the Chrome app.
- Step 2. At the right side of the address bar, click on the More option and choose Settings.
- Step 3. Choose the Privacy option from the Advanced tab.
- Step 4. Click on the “Do Not Track” option to turn on the feature.
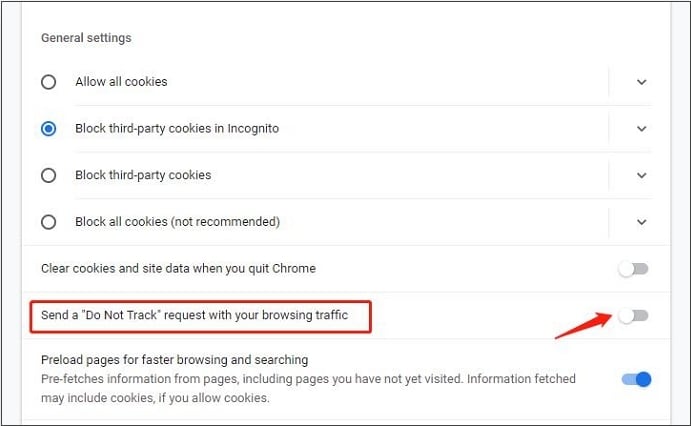
Enable “Do Not Track” on Google Chrome for Computer
- Step 1. Launch Chrome on your system, and from the menu at the upper-right corner, click on the Settings option.
- Step 2. From the “Privacy and Security” tab, choose the “Cookies and other site data” option.
- Step 3. Tap and enable the slider next to “Send a “Do not track” request with your browsing traffic.”
Part 5: Recommended Solution: Fake a Location to Stop Cross-Site Location Tracking Using Dr. Fone
What if you let the sites and cookies track your phone location without worrying about your privacy? Yes, it can be done by spoofing your location. So, if you set a fake location while browsing the internet, you will not have to worry about cross-site tracking, as anyways, the sites and cookies will get misled browsing information that cannot harm you in any manner.
Setting a fake location on your iOS devices, a professional tool is needed, for we recommend Wondershare Dr.Fone - Virtual Location as the best tool. Using this Android and iOS-based software, you can set any fake GPS location on your device. The tool is simple to use and does not require any mastery of technical know-how.
Key features
- Simple tool to teleport to any GPS location in a single click.
- Allows simulating GPS movement along the route.
- All popular models of Android and iOS devices are compatible.
- Compatible with all location-based apps on your phone.
- Compatible with Windows and Mac systems.
Here is a video tutorial for you to take an overview of how to use Dr.Fone - Virtual Location to fake location on your Android and iOS devices.
 safe & secure
Steps to set fake location on your Android and iOS devices using DrFone-Virtual Location
Step 1. Download, install and launch the software on your Windows or Mac systems. On the main software interface, choose the Virtual Location option.
Step 2. Connect your iPhone or Android device to your system using a USB cable and then tap on the Get Started option on your software interface.

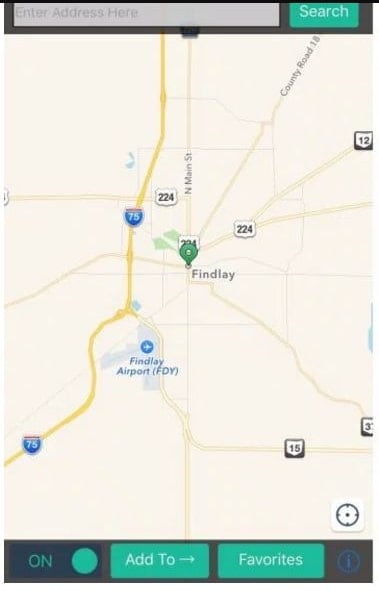
Step 3. A new window on the software interface will open, showing your connected phone’s real and actual location. If the detected location is incorrect, click on the “Center On” icon to display the right device location.
Step 4. Next, you need to activate the “teleport mode” and click o the 3rd icon at the upper-right corner.
Step 5. Next, you have to enter now the fake location to which you wish to teleport to at the upper-left corner. Click on Go.

Step 6. Finally, tap on the Move Here button and the new fake location for your connected Android or iOS device at the pop-up box.
Check the new location of your phone from the app.

Wrap it up
Preventing Cross-site tracking can be done on different browsers and devices using the guides listed in the above parts of the article. Settings a fake location for your device using Dr. Fone-Virtual Location is another interesting way to prevent tracking your browsing history by spoofing the sites and cookies. Setting a fake place will not only avoid monitoring your browsing history but will also work with all location-based apps on your phone.
safe & secure
6 Ways to Change Spotify Location On Your Infinix GT 10 Pro

Spotify’s booming audio business is proof that people are in love with its services. If you want to listen to your favorite retro song, or you want to discover the latest hits, Spotify has everything. You can also listen to some really good podcasts and album hits. But what most of us don’t know is that your Spotify Location can determine what kind of content you might come across on the platform.
Your playlist suggestions depend on the country and region you are staying in. And in case you are unable to access any particular song or album, that can be because of your location too, If you are planning on Spotify Change Location, then here are 6 effective ways that will instantly get the job done or you, no matter where you are in the world.
Part 1: By-Passing geo Restrictions in Spotify
Before we find out about the 6 different ways to update location Spotify, let us understand why it is important to by-pass these geo-restrictions and what are these hindrances in the first place.
Region Specific Content
The main reason anyone would want to change their Spotify location is when they change countries. If you want to access content relevant to this new region, it is best to go with Spotify Change Country. When you change our spotify location, you will get the regionally most-played songs or most liked podcasts as suggestions. This way, you can access quality content of this place that you’ve shifted to.
Geo-Based Suggestions
Now, your coordinates can decide what kind of playlists Spotify compiles for you. The music streaming app can surprise its fans by bringing together some of the best songs from the region. Depending upon your location, only the most liked songs of that location are brought together. This makes life easier for those who like to listen to songs and content in their regional languages.
But is Spotify available everywhere?
How we wish this was true! However, Spotify is not available in all the countries. Though ts has decided to extend its services to most of the Asian and European countries, currently, it is available in roughly 65 countries only. By the end of 2021, it might be available in over 170 countries, Until then, tweaking location becomes important.
The problem with Spotify update location is that - you can only change your country when you installed Spotify in a particular country and then shifted to a new one. If you are trying to change location within the same geographical boundaries, it doesn’t support those actions. Also, the free users have to change their location manually while the Premium Subscribers can access the content available in all the Spotify Hosting countries.
Part 2: Best Tools to Fake GPS on iPhone
Most of the users want to make the best use of this tremendously efficient Music-streaming app. It is having a keen eye for quality audio and also hosts some of the best podcasts and content. To make that possible, you can use some of the best online tools to fake spotify location whenever you want. Instead of going for the regular Spotify Update Location, you can use these third-party applications to change the location on your iPhone devices (will reflect in Spotify too).
The Wondershare’s Dr. Fone is a very good application that lets you change location Spotify with a few easy steps. It hardly takes a few minutes and this is how you go about it-
Dr.Fone - Virtual Location
1-Click Location Changer for both iOS and Android
- Teleport from one location to another across the world from the comfort of your home.
- With just a few selections on your computer, you can make members of your circle believe you’re anywhere you want.
- Stimulate and imitate movement and set the speed and stops you take along the way.
- Compatible with both iOS and Android systems.
- Work with location-based apps, like Pokemon Go , Snapchat , Instagram , Facebook , etc.
3981454 people have downloaded it
Step 1: Go to the official website of Dr. Fone - Virtual Location (iOS) and you will find the download versions for Mac, and Windows. Download and launch the application.
Step 2: Once you launch it, from the options displayed on the screen, go for Virtual Location (usually at the bottom).
Step 3: Then connect your iPhone to your computer and click on ‘Get Started’.
Step 4: A map with the coordinates of the entire world will appear. On the top right corner of the page, click on the third icon - Teleport Mode. Now, choose the place that you want to virtually shift to.
Step 5: Click on ‘Move Here’.
The new Virtual Location will display on your iPhone Location Settings as well and Spotify update location will also be the same.
The process doesn’t take much of your time and you can change your location any number of times that you want. Not only on Spotify, your other social media apps and location using apps will also record the new virtual location.
Cydia - Location Faker App
For the Spotify Change Region, Cydia’s Location Faker App is the perfect choice for iPhones. The software is also available in different versions to choose for your device model. You won’t need a computer for this and everything happens over your iPhone only.
Step 1: Download the Locationfaker version suitable for your phone. Locationfaker8 is available for the 8.0 version of iPhone.
Step 2: You will notice a map appear on the screen. You can either move your pin-point to the new location or enter the address or coordinates into the search box on top of the page.
Step 3: Once you settle with the coordinates, shift the ‘Off’ toggle to ‘On’. It is present at the bottom of the page.
Step 4: On the bottom of the page, in the same line as the toggle, you will find the ‘i’ icon. Click on that and several options will open. From there, choose ‘White List’. All the apps that need access to your new location will display. Search for Spotify and enable it.
Cydia - Location Handle App
To change spotify region, the Location Hanle App from Cydia might bring in more benefits than the usual location spoofing options. This is usually a very good choice for those people who play games and like to fool their friends with a fake location. However, for Spotify update Location, it still does a great job.
Step 1: You can download the Location Handle application either from their website or the app store. Wait till it completely installs.
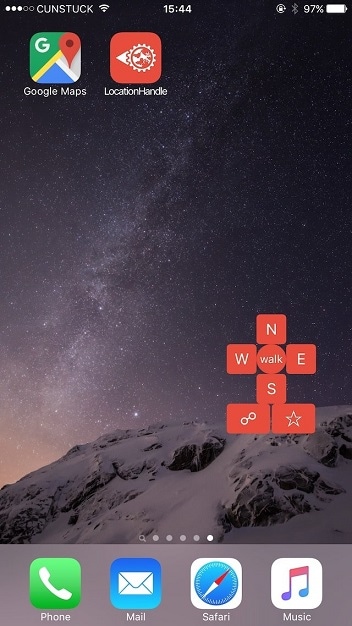
Step 2: Now, the map tab will appear along with an option to choose from 4 location changing types.
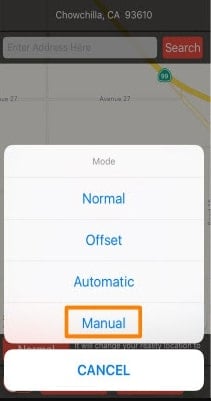
Cydia - Location Handle App
- Normal Mode - Change the location to anywhere
- Offset Mode - Change to a location that is only a few feet away.
- Automatic mode - Change to a new location slowly, as if you were walking.
- Manual Mode - change to a new location by using the joystick to navigate.
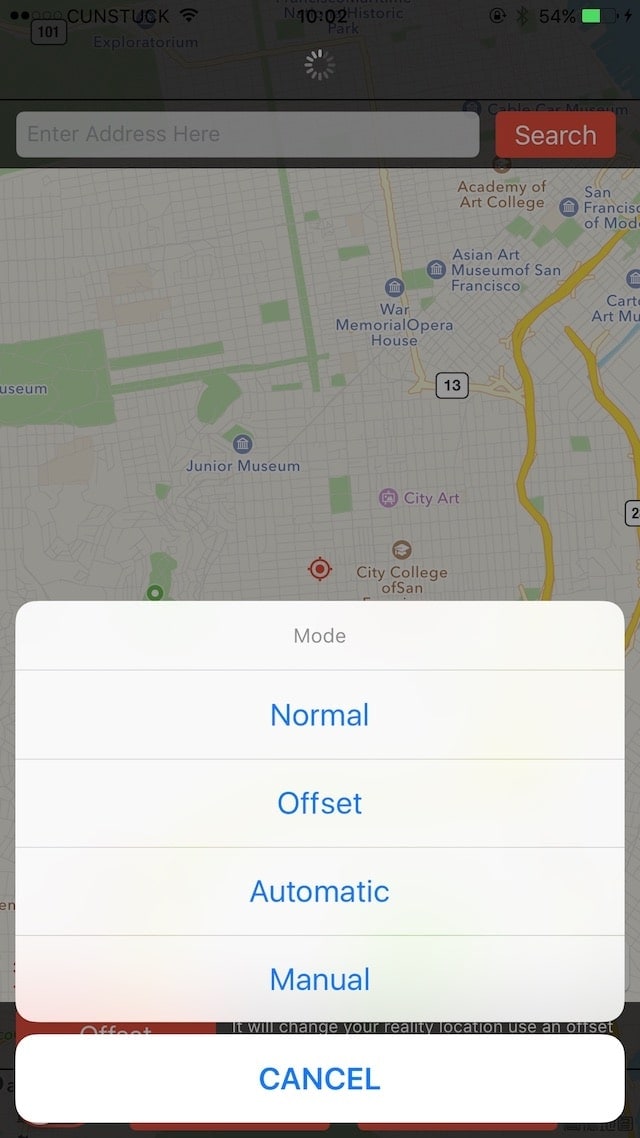
Step 3: Here, we are learning how to achieve Manual Spotify Change Region. So, go with the Manual Mode
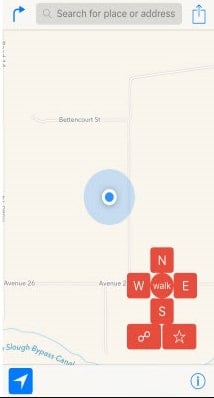
Step 4: Now the map will appear on the page, more clearly with the pin and a search box for entering coordinates will also display. You can update Spotify location there.
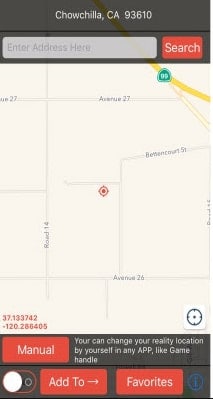
Step 5: The Joystick will show you the different directions and when you move it, your location on the map also changes. Settle on the one that best fits you and proceed.
Part 3: Best Tools for Fake GPS on Android
We have seen how to chive the Spotify Location update using the tools that work great in iPhones. In fact, you can use Dr. Fone on Android as well. Here are some other efficient GPS Faking tools that you can specifically use with your Infinix GT 10 Pros.
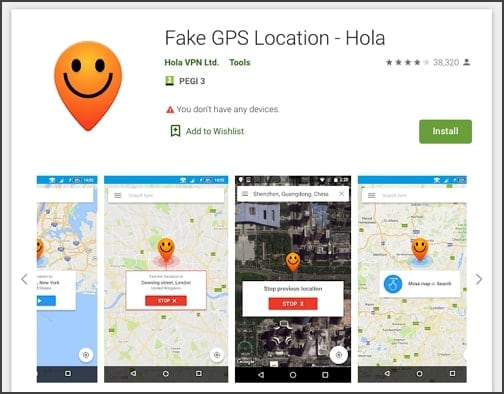
Hola Fake GPS
Hola Fake GPS is a direct Android app that you can use to change country on Spotify.
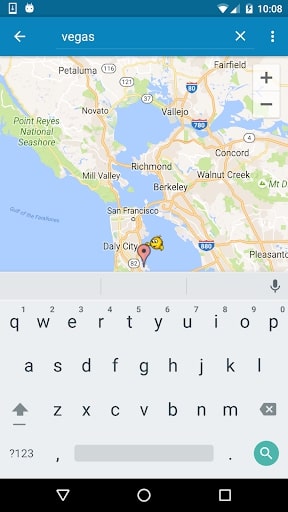
Step 1: In the Google Play Store, Search for ‘Fake GPS-Location - Hola’. The app appears with a smiley pin-point as an icon. Click on that and install on your Infinix GT 10 Pro.
Step 2: Now, a map will appear showing your current location in the world. You can shift the pin to a new location or simply type the address into search bar.
Step 3: The location pin will slowly start moving from current location to new location. At any point if you want to ‘STOP’, you can click on the Stop button that is present on the screen at this point.
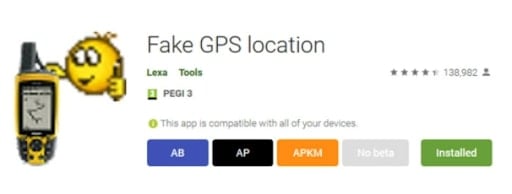
Fake GPS by Lexa
This is a free app that helps to Change region Spotify within a few minutes. You can also use it for making some advanced changes if you are gaming or trying to access restricted content on other apps.
Step 1: Go to the Google Play Store and download Fake GPS by Lexa.
Step 2: Once you launch the app, the mp with your current location will be displayed. Enter a new location in the search box.
Step 3: The app will try to detect the new location that you have entered. Once it is successfully done, you will find that your new location will reflect in all the apps that have access to your Infinix GT 10 Pro’s location. Including Spotify.
Part 4: How to use a VPN to change Spotify Location?
The Virtual Private Network apps will change your server and your location and IP address will be masked completely. We suggest that you use NordVPN, that is quite easy to work with.
Step 1: Download NordVPN from the App Store or Google Play Store
Step 2: To change Location on Spotify, Sign Up and NordVPN will find the nearest server for you.
Step 3: If you do not prefer the server that they connected to you, disconnect from that server. You can update location on spotify using another server.
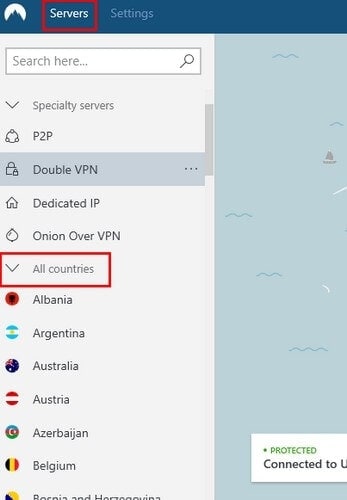
Step 4: Then go to ‘More Options’ > Servers > All countries and choose the country that you want. The same will reflect on Spotify too.
Conclusion
If you want to update location on spotify, then these are the 6 methods that you can use to change location in Spotify anywhere, anytime and any number of times. Avail all the benefits of this supreme audio application by choosing to be anywhere in the world ‘virtually’.
You Might Also Like
Location-based apps
GPS spoof for dating apps
GPS spoof for social apps
Pokemon Go on PC
AR game tricks

Change Phone GPS Location Easily
- ● Teleport GPS location to anywhere
- ● Play AR games without moving
- ● Spoof Location on the popular Apps
Also read:
- [New] In 2024, Content Creator's Arena Vs. Beta Studio Evolutionary Path
- 10 Best Fake GPS Location Spoofers for Oppo A59 5G | Dr.fone
- 2024 Approved Understanding Bandicam - Key Facts Revealed
- 3 Ways to Change Location on Facebook Marketplace for Motorola Moto G84 5G | Dr.fone
- 3uTools Virtual Location Not Working On Motorola Moto G34 5G? Fix Now | Dr.fone
- 4 Methods to Turn off Life 360 On Apple iPhone SE (2020) without Anyone Knowing | Dr.fone
- 5 Best Route Generator Apps You Should Try On OnePlus Ace 2V | Dr.fone
- Désormais en Panne Avec HandBrake Sous Windows 10 ? Explorez Nos Solutions Rapides Et Alternatives Fiables
- How to Spy on Text Messages from Computer & Apple iPhone 15 | Dr.fone
- How to Unlock Honor X50 GT Bootloader Easily
- Ideal 7 Cameras To Improve Your YouTube Vlogging Experience
- In 2024, How To Simulate GPS Movement With Location Spoofer On Asus ROG Phone 8? | Dr.fone
- In 2024, The Science of Space How Layout Affects Professional Effectiveness
- Revo App Manager Installation & Activation - Quick and Simple Methods
- Title: A Detailed Guide on Faking Your Location in Mozilla Firefox On Infinix GT 10 Pro | Dr.fone
- Author: Mia
- Created at : 2024-09-26 17:00:29
- Updated at : 2024-10-01 16:52:38
- Link: https://location-fake.techidaily.com/a-detailed-guide-on-faking-your-location-in-mozilla-firefox-on-infinix-gt-10-pro-drfone-by-drfone-virtual-android/
- License: This work is licensed under CC BY-NC-SA 4.0.