
3 Ways to Change Location on Facebook Marketplace for Nokia G22 | Dr.fone
3 Ways to Change Location on Facebook Marketplace for Nokia G22
Facebook Marketplace is a hub designed within Facebook that enables Facebook users to buy and sell stuff online. This marketplace has optimized the chances of buying and selling legit stuff, including household appliances, clothes, and electronic devices. You must enter the pictures of that product and write a good description.
All the potential buyers from the nearest locations will access it. Moreover, you can look up stuff on the marketplace and order your favorite product with just simple clicks. It is also possible if you want to change the location of marketplace listings to attract buyers and sellers of your nearby areas.
The following discussed points in the article will teach you how to change location on the Facebook marketplace:
Part 1: How to Change Location on the Facebook Marketplace on iOS and Android Devices
The Facebook Marketplace is a feature that finishes the gap between social media and digital marketplaces. With this helpful feature, you can now buy and sell items on your Facebook account to other Facebook users. In addition, you can filter the listings and see the buyers from a specific location by changing to a location.
Here, we will teach you the steps involved in changing the FB Marketplace location on your Android and iOS devices:
Step 1: The first step requires you to open the Facebook app on your Nokia G22 or iPhone. Login to your Facebook account to initiate the procedure.

Step 2: If you have an Android device, you will see a hamburger icon situated at the top-right corner. You have to click on it to access the Facebook menu. Or, if you have an iPhone, click on the three dots on the bottom side of the application.
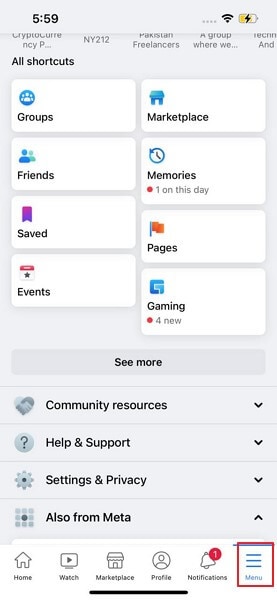
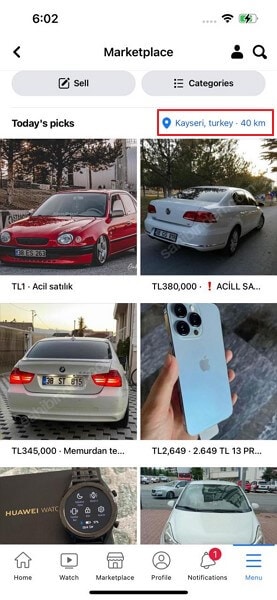
Step 3; After doing the prior step, you will now access the “Facebook Marketplace” feature. Your current location will be written in blue on the upper-right side of the existing Marketplace listings. You should click it to change your Marketplace location.

Step 4: Use the “Search Bar’ at the top of the screen to search and select the new location. After entering the target place, tap on the “Apply” button. You can also adjust the distance slider below “Custom radius” to change the location.

Step 5: Now, the Facebook Marketplace will refresh. You will now be able to see new listings for the selected location.
Part 2: How to Change Facebook Marketplace Location on Facebook Website
If you are using Facebook from a browser, it is also achievable to change the location and control the listings yourself. To perform this process on a browser, follow the given steps and achieve the Facebook marketplace change location:
Step 1: Access Facebook through the browser of your choice and sign in to your Facebook account.
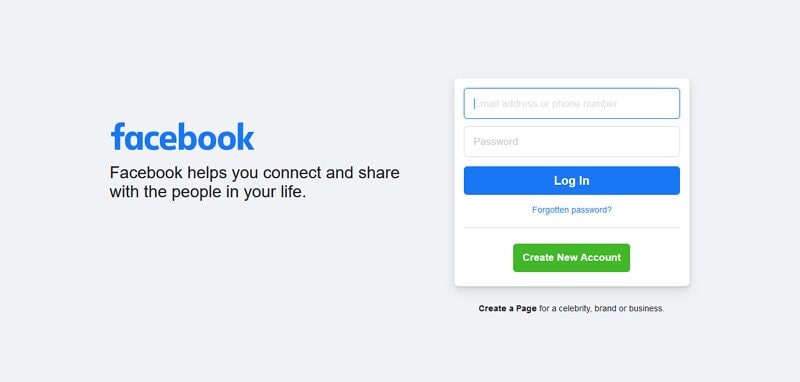
Step 2: There will be a “Marketplace” icon; click on it. Now, the current location will be displayed on the screen. You have to tap on your current location to fake the location of your marketplace.

Step 3: Enter the desired location and hit the “Apply” button. The listing search radius can also be changed with the help of the dropdown button.

Step 4: Facebook marketplace will be refreshed, and your new listings for the selected location will be visible.

Part 3: Facebook Marketplace Location Won’t Change? One-Click to Solve It
Dr.Fone – Virtual Location is an application that allows users to change their device location virtually. You can quickly teleport the GPS location to places of your choice. It is now super-easy and secure to virtually change your current location, bypass all the restrictions, and filter the listings on your Facebook marketplace.
What Makes Dr.Fone – Virtual Location the Best Solution?
The application holds a wide range of uses and characteristics, so it is considered the best way to change location. The following key points are mentioned why it is the best location changing solution available:
Dr.Fone - Virtual Location
1-Click Location Changer for both iOS and Android
- Teleport from one place to another across the world from the comfort of your home.
- With just a few selections on your computer, you can change the location on your Facebook marketplace.
- Stimulate and imitate movement and set the speed and stops you take along the way.
- Compatible with both iOS and Android systems.
- Work with location-based apps, like Pokemon Go , Snapchat , Instagram , Facebook , etc.
3981454 people have downloaded it
Simple Steps to Fake your Location on Facebook Marketplace
The following step guide will assist you in changing the location of the marketplace listing to get targeted buyers or sellers for the Facebook marketplace:
Step 1: Install the Program
The first step requires downloading Dr.Fone- Virtual Location (iOS/Android). Now, install it and launch the software on your PC.
Step 2: Connect your Phone
Click on “Virtual Location” from the available options and connect your phone to the computer with a USB cable. IPhone users, once connected, can link the software with Wi-Fi without any USB cable. Now, press the “Get Started” button.

Step 3: Provide your Desired Location
Now, activate the “Teleport Mode” by clicking the first icon on the upper-right side. Next, enter the target place you want to teleport to and click on the “Go” button.

Step 4: Change your Location
Now, click on “Move Here” in the popup box, and your location will be changed. Your Android or iOS device location will be shifted to the added location now. Then, you can open Facebook and see the buyers and sellers of the given location in the Marketplace.

Part 4: FAQs about Facebook Marketplace
- What are the extra services for me after changing my location on Facebook Marketplace?
There are no extra services given on the Facebook Marketplace after changing the location. You will be able to access the audience of the selected location.
- Is it secure if I give my address on the Facebook marketplace?
You must not offer your full name and your contact details. Meet in a safe and public place such as a park, restaurant, shopping mall, or police station. However, you still should not give your details to the buyer.
- Why is my Facebook marketplace displaying the wrong address?
You might have used a VPN service in the past, which affected your actual address on the Facebook Marketplace. Don’t worry, as you can change the current location with a mere click.
- How to change the Facebook marketplace plan?
There is no plan required to use the Facebook Marketplace. This feature is entirely free for all Facebook users.
- How to maximize sales on the Facebook marketplace?
There are various methods to attract more buyers to you. First, try to optimize the Facebook listing by adding more keywords in the description and title. Also, write a longer description and explain more details about the item. You can also hire a photographer who will take good pictures of your product.
Conclusion
The article concludes with how to change location on the Facebook Marketplace to perceive buyers and sellers of your nearby areas. This way, you will be able to meet the buyer or seller yourself and discuss the product peacefully. With Dr.Fone - Virtual Location , you can change the location of the marketplace listing and teleport to a place you want to sell/buy in.
 safe & secure
How to Stop Google Chrome from Tracking Your Location On Nokia G22?
Do you know your web browser is continually sharing your actual location online? You might not have noticed, but the number of websites using your location has increased. As you are well aware of the dangers of the internet, it doesn’t make sense to turn your Chrome into a beacon for ill-intentioned people. Luckily, it is possible to fake a location on Chrome with the right tool.
Are you wondering how to fake the browser location or which tool to use? You can get all your answers by reading this article till the end.

Part 1: How Does Chrome Know Your Location?
Before discussing Google Chrome’s fake location, it is important to know how Chrome detects your physical location. Google Chrome uses many ways to pinpoint your exact location, like your IP address, GPS, Wi-Fi, Bluetooth, and Cell Tower data. Every internet connection has an IP address bound to a location that enables Chrome to identify your location.
Similarly, GPS location can easily be tracked if your phone device has it enabled. All the Wi-Fi and Bluetooth connections around you also have location information embedded in them. They can help Chrome track you as long as your device can detect them. If you use cell data, Google Chrome can also track you through cell towers.
Part 2: How to Hide Location Services in Chrome?
If you are worried about Google Chrome detecting your physical location and sharing it with websites and apps, you can hide it easily. The process of hiding your location on Google Chrome is simple, even if you are using multiple devices. Below is the step-by-step process of hiding location services in Google Chrome on computer, Android, and iOS devices.
Method 1: For Laptop and Desktop PCs
Step 1: Launch Google Chrome on your computer and click the “Three Dots” icon to open the Google Chrome Settings. Here, tap “Privacy and Security” from the left sidebar and select “Site Settings.”

Step 2: Navigate to “Permissions” and click on “Location.” To hide the location on Google Chrome, select the “Don’t allow sites to see your location” option.

Method 2: For iPhone or iPad
Step 1: Navigate to “Settings” on your iPhone and open it. Scroll down until you find the “Chrome” app option and select it.

Step 2: Press “Location” on the next screen to open the location options for Google Chrome. Here, choose “Never” to stop Google Chrome from detecting your location.

Method 3: For Android
Step 1: Open Google Chrome on your Nokia G22, press the “Three-Dots” icon, and tap “Settings” from the options.

Step 2: In Chrome Settings, press “Site Settings.” Now select “Location” and hide your location by toggling off the “Location” option.

One way to protect your privacy and stop websites from tracking your location is to turn off the location, but it has many disadvantages. If you have turned off your location, you can’t use any location base service like food delivery, e-shopping, ride-sharing, etc. That’s why it is better to use a fake location on your browser. Below we have explained four methods for Chrome fake location.
Method 1. Best Tool to Fake Chrome Location On iOS and Android Phones
The easiest and quickest way to fake your location on Google Chrome is to use Dr.Fone - Virtual Location . Since smartphones contain a wide range of apps that require location access, it provides a stable way to fake Chrome locations on Android and iOS phones. No website or app will be able to detect that you are using a fake location when using Dr.Fone - Virtual Location for faking GPS location.
Key Features
- Dr.Fone - Virtual Location can be used for any social media app like Facebook, Twitter, or Instagram with a fake location.
- With the help of this tool, you can also spoof real-time tracking apps like Life360 to protect your privacy.
- If you are an iPhone user, you don’t have to jailbreak your iPhone to spoof your device’s location.
How to Fake Chrome Location On iOS/Android Phones via Dr.Fone - Virtual Location
Faking your Chrome location with Dr.Fone - Virtual Location is very straightforward. You only need the Dr.Fone mobile toolkit and a USB cable to connect your Nokia G22. Follow these steps to spoof Chrome location on Android and iOS phones:
Step 1: Connect Your Android/iOS Device to Your Computer
Connect your Android or iOS phone to your computer using a USB cable. Launch the Dr.Fone robust toolkit on your computer and select “Virtual Location.”
Step 2: Activate the Teleport Mode
Press “Get Started” on the next page to open the map window. First, select your actual location by pressing the “Center On” icon from the right sidebar. Afterward, click on the “Teleport” icon from the top right corner to activate the Teleport Mode.

Step 3: Add the Desired Fake Location
Once the Teleport Mode is activated, add your desired location and press “Go.” Your desired location will open on the map. Select it, and a pop-up window will appear where you need to press “Move Here.” With that, your Android or iPhone’s Chrome location has been changed.
Method 2. Manually Change Your Location Using Google Chrome DevTools
It is also possible to fake browser location on Chrome using the Google Chrome Developer Tools. It is a built-in feature of Chrome and can be used to manually change or turn off your browser’s location. Follow these steps for changing location on Chrome with DevTools:
Step 1: After opening Google Chrome, click the three-dots icon from the top right corner. It will open the Chrome menu where you need to select “Developer Tools” after clicking “More Tools.”

Step 2: A window will open on the right side with all the developing tools you can use in Chrome. Click on the three-dots icon located near “Console” in the bottom left corner of the window. Choose “Sensors” from the pop-up menu.

Step 3: Access the newly selected “Sensor” option, and here you can change the browser’s location by either selecting a Google’s pre-set location or adding your desired location manually. Once the location is selected or added, your browser’s location will change.

Limitations
- The interface of the Google Chrome DevTools can be very confusing and overwhelming for non-technical users.
- Apart from pre-added locations, it can be hard to add a specific location as your fake location.
Method 3. Fake Your Location Using Chrome Extension
Many fake location Chrome extensions are available on Google Chrome which can be used to alter your location on Chrome. You can find these extensions on Google Chrome Web Store and add them directly to your browser. Below we have explained the steps for using such an extension “Location Guard “ to fake your location on Google Chrome:
Step 1: Open the “Location Guard” on Chrome Web Store and click “Add to Chrome” to add it to your browser. Once the “Location Guard” extension is added, open it and press “Options.”

Step 2: In the options, you can choose different options like Privacy Levels, Protection Area, and Time for Location Cache. It is recommended you choose a higher level for more protection.

Step 3: You can also use the “Fixed Location” feature to set up a fake location as a permanent location for your browser. The fixed location can be added by using the market or clicking on the desired place on the map.

Limitations
- Location Guard doesn’t protect your IP address. It means some websites can still detect your real location using the IP address.
- The app is not updated for quite a while, that’s why the map of the fixed location feature is quite restricted.
Method 4. Spoof Your IP Using a VPN Server
Another way you can fool websites and your browser by displaying a fake location online is to use a VPN server. VPNs fake your IP address to fool websites and apps into detecting your location. NordVPN is a VPN that can be used to spoof your IP by following these steps:
Step 1: Download and install NordVPN on your computer or phone and log in using your account. If you don’t have a NordVPN account, you must create one first.
Step 2: If you want to just change the location of your device, you can select “Quick Connect.” Using it will enable the program to automatically find the most suited fake location for you.

Step 3: You can also choose the desired location as your fake Chrome location in NordVPN. To do that, scroll down the list of countries and locations and choose your desired locations to connect to.
Limitations
- NordVPN can only spoof your IP address and will not work for geo-restricted applications.
- Using a VPN usually affects your internet speed and can make browsing slower and more difficult.
Part 4: FAQs
1.What is Geolocation?
Geolocation is a term used for the process of pinpointing the location of a device connected to the internet. The location can be determined using methods like IP address, GPS, and mobile tower data. Apps and websites commonly use it to provide location-based services.
2.What is the HTML5 Geolocation API?
The HTML5 Geolocation API is a browser API used to determine a user’s geographical location. Developers use it to build location-aware websites and apps that use users’ locations as the basis for providing their services. It can detect location through GPS, Wi-Fi, Bluetooth, IP addresses, etc.
3.Why should you hide or spoof your Location?
Hiding or spoofing your location protects your privacy and stop application and websites from tracking you. It also allows you to access geo-restricted apps and play location-based games. You can also fake your location to get the latest updates of your favorite apps.
Conclusion
The fact that Google Chrome in your devices can track your location with an accuracy of up to 20 meters is very unsettling for users. Even when you try to be careful in granting location permissions to apps and websites, many can still bypass this by adding location access requirements in terms and conditions.
That’s why having a tool like Dr.Fone - Virtual Location to fake GPS online is essential nowadays. It can ensure your privacy and helps in protecting you from the dangers of the internet.
What are Location Permissions Life360 On Nokia G22?
Sometimes you need to decide whether you can share certain personal information or data about yourself with others, which may involve location permissions.
Location permissions Life360 allows you to share the location of your device with other apps, even if those apps aren’t in your app library. It’s usually a good idea to use location permissions sparingly, but sometimes you’ll need to use them.
Life360 uses location permissions for a few different reasons. For example, Life360 uses location permissions to show nearby friends when they check in to places so that you can see who is nearby and what they’re up to.
Part 1:What Does “Location Permissions Off” Mean on Life360?
There are two ways to prevent GPS tracking on the phone: switch off the phone’s GPS or take off Life360 rights to track your whereabouts using GPS.
It’s possible that Life360 won’t work properly if you don’t accept the permissions it requests during the installation process. When it comes to authorizing access to Life360, you have the following choices available to you:
If you choose the ‘never option’, the application will not be granted the required rights. As a result, the software may fail to perform as it is meant to. Whether you’re unclear if you want to offer the program complete access or not, this is the ideal ‘Ask any time’ decision to bring.
Your location may be granted every time the app is used if you wish. ‘While the App’ setting permits accessibility to Location Services only when the app itself or one of its functionalities is currently displayed on the screen.
Your device’s status bar may glow blue and display a message notifying you that an application is currently using your location data if the While Using the App setting is enabled for one of your apps.
“Always” grants the software all the permissions it needs. So, for example, allowing location permission will be done – every time the app launches. As a result, the software can track your location even if the application is closed.
Part 2:Can My Nokia G22 Be Tracked If Location Services Are Off?
If you misplace your phone or want to run an application that requires to access your location, you may use the already developed location settings on your smartphone. Suppose, on the other hand; you don’t want anybody to track your phone?
Is it possible to track a phone even if the location services are disabled? Mobile phones can be tracked even when location services are off, and the answer to that question is, “Yes.”
Disabling your phone’s location services might help you hide your current whereabouts. This is critical if you don’t want others to be able to follow your movements or activities. However, other methods may still find a smartphone’s overall geolocation using different ways.
1. Cell-Site Simulators
A cell-site simulator is a device that can imitate a mobile phone tower and force a nearby mobile phone to connect to it. Cell site simulators can be purchased online or at a local electronics store. Law enforcement agencies use them to locate a phone without a warrant.
2. Malware or Spyware
Malware and spyware can use various techniques to track your phone’s location. For example, a malware program may be able to detect your location based on Your Nokia G22’s hardware.
Some mobile malware or spyware can detect and track your location without the need for the user’s consent.
3. Cell Towers
Cell towers can provide a rough estimate of a phone’s location. A cell tower is a network access point that connects a mobile phone to the Internet. A smartphone’s location can be found by triangulating the position of cell towers near your device. This method works best when the cell towers are close together.
4. Wi-Fi Snooping
When a Wi-Fi hotspot is nearby, your phone can connect to it without needing to connect to a cell tower. Your phone can then transmit the signal back to the hotspot, which will record the Nokia G22 device’s IP address.
Part 3:How Do I Pause Life360 without My Parents Knowing?
There are many ways to ensure your parents do not know where you are and what you are doing. Some of these methods are:
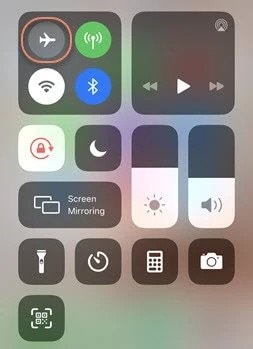
1. Switch to the Airplane Mode
Turning on Airplane Mode on your smartphone is another fast approach to preventing Life360 from broadcasting your whereabouts without your parents being aware. Unfortunately, you’ll be unable to use your phone’s internet connection after setting off Airplane Mode, so you’ll lose your GPS position.
2. Make Sure to Turn Off Circle’s Location Sharing
It’s your choice whether or not you want to share your location information with others in a particular circle or detach from a circle.
- Access the Life360 app’s settings by tapping Settings in the upper right-hand corner.
- When you’re done monitoring your position, choose a circle on the UI to do so.
To disable the function, choose the Location Sharing menu item and then drag the flip to the off setting.
- Go to your phone’s settings and look for “Location Sharing Paused.”

3. Stop Using the GPS on Your Device
Stopping location sharing on Life360 may also be accomplished by turning off the GPS service, another viable alternative.
* For Android Users
- Launch the Settings app on your Nokia G22, then scroll down until you find “Privacy” and tap it.
- To prevent applications from monitoring your location, uncheck the “Location” option.

* For iPhone Users
- Navigate to the Settings menu on your iPhone.
- To disable this feature, enter the “Location Services” menu by selecting the “Personal” tab and selecting the appropriate option.

4. Take use of a Burner Phone
Burner phones make it very easy to disable location tracking on Life360. In addition, disposing of a burner phone keeps your personal information private and secure.
- Install Life360 on the burner phone, and then login in using the same account you used on your primary device.
- Establish a connection between your phone and the free Wi-Fi that is accessible.
- If you delete this application from your smartphone, your parents will no longer be able to monitor your phone use.
5. Trust Dr.fone
Smartphones have taken over the globe, and almost everyone has one. In addition, apps for smartphones, such as those for monitoring children, have been developed as a result of advances in technology. Using programs like Life360, parents can keep tabs on their children and teens. However, for some children and teenagers, Life360 disturbs their privacy, and they don’t enjoy being tracked around the clock by the program.
It may be difficult to trick the iPhone’s GPS, and doing so needs dependable and secure solutions, such as Dr.Fone - Virtual Location (iOS/Android) . Users of iOS devices will appreciate this app’s ability to quickly and safely fake their current location without compromising their personal information. The most excellent part is that it’s simple to use and set up. Additionally, with Dr.Fone - Virtual Location (iOS/Android), you may relocate to any location and choose your own pace. Life360 and other location-based applications may be spoofed with a mouse click.
Dr.Fone - Virtual Location
1-Click Location Changer for both iOS and Android
- Teleport from one location to another across the world from the comfort of your home.
- With just a few selections on your computer, you can make members of your circle believe you’re anywhere you want.
- Stimulate and imitate movement and set the speed and stops you take along the way.
- Compatible with both iOS and Android systems.
- Work with location-based apps, like Pokemon Go , Snapchat , Instagram , Facebook , etc.
3981454 people have downloaded it
It’s pretty simple to use Dr.Fone, and here are the instructions.
- Step 1: Once you’ve downloaded Dr.fone from the official site, you’ll need to install it on your computer or system.
- Step 2: Install it and then run it. As soon as you’ve plugged in your iOS device, press the “start” icon.

- Step 3: You’ll now be able to view your present position on a map. Use the map’s teleport feature in the upper right corner to look for a particular spot.
- Step 4: To relocate to a new place, do a scan and then hit the “move here” option.
- Step 5: Finally, Your spoofing skills have been fully unlocked!

Conclusion
Life360 is a handy app, but it can be frustrating when a child or teen doesn’t want to use it. It’s easy to fool the app and trick it into thinking that you’re at home or school, but you’re not. Hence, Dr.Fone - Virtual Location (iOS/Android) is an excellent app for faking your location and keeping your personal information safe.
Also read:
- 2024 Approved Blitzing Sharing Easy YouTube Playlist Methods
- 2024 Approved Unveiling the Wonders of Phantom’s Chrono Inversion
- 3 Ways to Change Location on Facebook Marketplace for Motorola Defy 2 | Dr.fone
- 5 Easy Ways to Change Location on YouTube TV On Vivo X100 Pro | Dr.fone
- 5 Hassle-Free Solutions to Fake Location on Find My Friends Of Infinix Note 30 | Dr.fone
- 5 Hassle-Free Solutions to Fake Location on Find My Friends Of Samsung Galaxy XCover 7 | Dr.fone
- 5 Hassle-Free Solutions to Fake Location on Find My Friends Of Samsung Galaxy Z Fold 5 | Dr.fone
- 8 Solutions to Fix Find My Friends Location Not Available On Itel P55+ | Dr.fone
- 8 Solutions to Fix Find My Friends Location Not Available On Xiaomi Redmi 13C | Dr.fone
- A Detailed Guide on Faking Your Location in Mozilla Firefox On Apple iPhone 11 Pro Max | Dr.fone
- Brighten and Sharpen Expert Tips for V2.2 Video Enhancement for 2024
- Complete Fixes To Solve iPhone XS Max Randomly Asking for Apple ID Password
- Free WinX DVD Ripper: Convert DVDs to MP4/AVI Formats Compatible with iPhones, Android & More
- How To Stop Recurring Blender Program Failure and Stability Issues On Your Computer
- Reclaiming Preferred Keyboard Settings in Windows 11
- Resolving 'Try Connecting Your Device' Issue in Win 11
- The Best iSpoofer Alternative to Try On Motorola Razr 40 | Dr.fone
- Title: 3 Ways to Change Location on Facebook Marketplace for Nokia G22 | Dr.fone
- Author: Mia
- Created at : 2024-12-15 03:47:03
- Updated at : 2024-12-15 21:11:41
- Link: https://location-fake.techidaily.com/3-ways-to-change-location-on-facebook-marketplace-for-nokia-g22-drfone-by-drfone-virtual-android/
- License: This work is licensed under CC BY-NC-SA 4.0.