3 Ways to Change Location on Facebook Marketplace for Apple iPhone 8 Plus | Dr.fone
3 Ways to Change Location on Facebook Marketplace for Apple iPhone 8 Plus
Facebook Marketplace is a hub designed within Facebook that enables Facebook users to buy and sell stuff online. This marketplace has optimized the chances of buying and selling legit stuff, including household appliances, clothes, and electronic devices. You must enter the pictures of that product and write a good description.
All the potential buyers from the nearest locations will access it. Moreover, you can look up stuff on the marketplace and order your favorite product with just simple clicks. It is also possible if you want to change the location of marketplace listings to attract buyers and sellers of your nearby areas.
The following discussed points in the article will teach you how to change location on the Facebook marketplace:
Part 1: How to Change Location on the Facebook Marketplace on iOS and Android Devices
The Facebook Marketplace is a feature that finishes the gap between social media and digital marketplaces. With this helpful feature, you can now buy and sell items on your Facebook account to other Facebook users. In addition, you can filter the listings and see the buyers from a specific location by changing to a location.
Here, we will teach you the steps involved in changing the FB Marketplace location on your Android and iOS devices:
Step 1: The first step requires you to open the Facebook app on your Apple iPhone 8 Plus or iPhone. Login to your Facebook account to initiate the procedure.

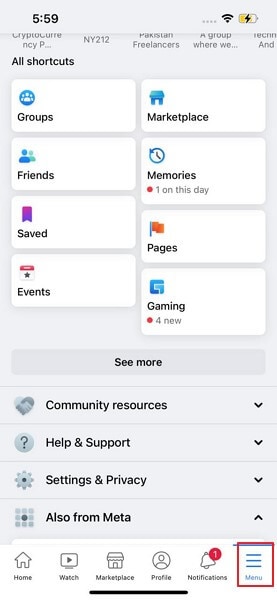
Step 2: If you have an Android device, you will see a hamburger icon situated at the top-right corner. You have to click on it to access the Facebook menu. Or, if you have an iPhone, click on the three dots on the bottom side of the application.
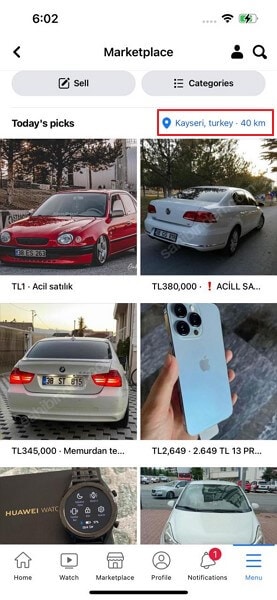
Step 3; After doing the prior step, you will now access the “Facebook Marketplace” feature. Your current location will be written in blue on the upper-right side of the existing Marketplace listings. You should click it to change your Marketplace location.

Step 4: Use the “Search Bar’ at the top of the screen to search and select the new location. After entering the target place, tap on the “Apply” button. You can also adjust the distance slider below “Custom radius” to change the location.

Step 5: Now, the Facebook Marketplace will refresh. You will now be able to see new listings for the selected location.
Part 2: How to Change Facebook Marketplace Location on Facebook Website
If you are using Facebook from a browser, it is also achievable to change the location and control the listings yourself. To perform this process on a browser, follow the given steps and achieve the Facebook marketplace change location:
Step 1: Access Facebook through the browser of your choice and sign in to your Facebook account.
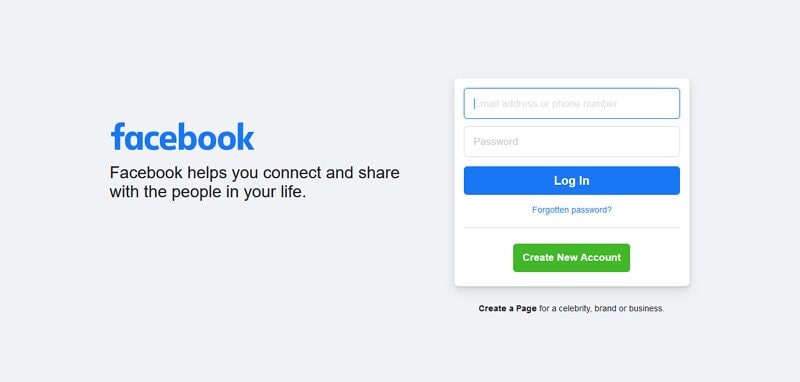
Step 2: There will be a “Marketplace” icon; click on it. Now, the current location will be displayed on the screen. You have to tap on your current location to fake the location of your marketplace.

Step 3: Enter the desired location and hit the “Apply” button. The listing search radius can also be changed with the help of the dropdown button.

Step 4: Facebook marketplace will be refreshed, and your new listings for the selected location will be visible.

Part 3: Facebook Marketplace Location Won’t Change? One-Click to Solve It
Dr.Fone – Virtual Location is an application that allows users to change their device location virtually. You can quickly teleport the GPS location to places of your choice. It is now super-easy and secure to virtually change your current location, bypass all the restrictions, and filter the listings on your Facebook marketplace.
What Makes Dr.Fone – Virtual Location the Best Solution?
The application holds a wide range of uses and characteristics, so it is considered the best way to change location. The following key points are mentioned why it is the best location changing solution available:
Dr.Fone - Virtual Location
1-Click Location Changer for both iOS and Android
- Teleport from one place to another across the world from the comfort of your home.
- With just a few selections on your computer, you can change the location on your Facebook marketplace.
- Stimulate and imitate movement and set the speed and stops you take along the way.
- Compatible with both iOS and Android systems.
- Work with location-based apps, like Pokemon Go , Snapchat , Instagram , Facebook , etc.
3981454 people have downloaded it
Simple Steps to Fake your Location on Facebook Marketplace
The following step guide will assist you in changing the location of the marketplace listing to get targeted buyers or sellers for the Facebook marketplace:
Step 1: Install the Program
The first step requires downloading Dr.Fone- Virtual Location (iOS/Android). Now, install it and launch the software on your PC.
Step 2: Connect your Phone
Click on “Virtual Location” from the available options and connect your phone to the computer with a USB cable. IPhone users, once connected, can link the software with Wi-Fi without any USB cable. Now, press the “Get Started” button.

Step 3: Provide your Desired Location
Now, activate the “Teleport Mode” by clicking the first icon on the upper-right side. Next, enter the target place you want to teleport to and click on the “Go” button.

Step 4: Change your Location
Now, click on “Move Here” in the popup box, and your location will be changed. Your Android or iOS device location will be shifted to the added location now. Then, you can open Facebook and see the buyers and sellers of the given location in the Marketplace.

Part 4: FAQs about Facebook Marketplace
- What are the extra services for me after changing my location on Facebook Marketplace?
There are no extra services given on the Facebook Marketplace after changing the location. You will be able to access the audience of the selected location.
- Is it secure if I give my address on the Facebook marketplace?
You must not offer your full name and your contact details. Meet in a safe and public place such as a park, restaurant, shopping mall, or police station. However, you still should not give your details to the buyer.
- Why is my Facebook marketplace displaying the wrong address?
You might have used a VPN service in the past, which affected your actual address on the Facebook Marketplace. Don’t worry, as you can change the current location with a mere click.
- How to change the Facebook marketplace plan?
There is no plan required to use the Facebook Marketplace. This feature is entirely free for all Facebook users.
- How to maximize sales on the Facebook marketplace?
There are various methods to attract more buyers to you. First, try to optimize the Facebook listing by adding more keywords in the description and title. Also, write a longer description and explain more details about the item. You can also hire a photographer who will take good pictures of your product.
Conclusion
The article concludes with how to change location on the Facebook Marketplace to perceive buyers and sellers of your nearby areas. This way, you will be able to meet the buyer or seller yourself and discuss the product peacefully. With Dr.Fone - Virtual Location , you can change the location of the marketplace listing and teleport to a place you want to sell/buy in.
 safe & secure
Complete Tutorial to Use GPS Joystick to Fake GPS Location On Apple iPhone 8 Plus
The web world offers many apps, including Google, Facebook, Uber, etc. that provide location-based services. This means such apps will need your location to work. However, there are some rare occasions when users don’t find this service welcoming and thus, they wish to fake GPS location.
One of the instances comprises a well-known location-based game – Pokemon Go, where users might want to mislead the app and make the phone not understand where they exactly are. There might be other cases as well. No matter what reason you want this to be done, we are here to introduce you GPS joystick app that helps you for the same. Here we go!
Part 1: Fake GPS Location - GPS JoyStick the App
GPS joystick is an app that helps the users to fake GPS with the help of an overlay joystick control. It is easy to use and works instantly when you wish to modify the GPS location. Providing a unique “Joystick” option, this app can be considered a useful fake GPS joystick apk. On a plus, the app has the best algorithm so that it can offer realistic GPS values.
Features:
- Able to make modifications in the location wherever you point the joystick.
- You can choose the current location with the help of a map or joystick.
- You can also get the GPX files imported and exported to favorites, routes, or custom markers.
- It offers a good amount of setting options to provide complete user customization.
- You can manage the settings regarding size, type, and opacity for the joystick.
- With the help of this fake GPS joystick apk, you can get an opportunity to show the distance and cool-down time information.
- There is also a hide option available to help you decide whether you want to hide or show the joystick on your screen.
- Moreover, you get 3 customizable speeds for the joystick.
Disadvantages:
- It requires a hell lot of steps that are confusing and tough to perform.
- Users have reported that the app only works for a few minutes after the first time of installation. Afterward, the app function to fake GPS location dies and is then good for nothing.
- You need to be tech-savvy to fake GPS location with a GPS joystick.
- Fake GPS joystick for Pokemon Go cannot perform well for it as reported by the users. Also, it drives the same result for other popular location-based apps or games.
Part 2: How to set up GPS JoyStick
Though, it is quite difficult to get through the process of setting up the GPS joystick apk to a fake GPS location. Remember, we’ve always got your back. Therefore, we would like to bring you up with a detailed streak of steps (if followed properly) to install and set up the fake GPS joystick apk easily.
Basically, the tutorial is categorized into 3 different streaks depending upon the different Android OS security patches and OS version. Therefore, before we begin with steps, let’s understand what you need to do to find your Android OS version or the Security Patch. Depending on the Security Patches or Android OS version, follow the tutorials mentioned below with falls compatible for your device.
- Take your Apple iPhone 8 Plus handy and launch the “Settings”.
- Now, scroll down to the “About phone” option at the bottom and then hit on it.
- Lastly, look for the “Android version” entry and “Android security patch level” entry from the information displayed over your screen.
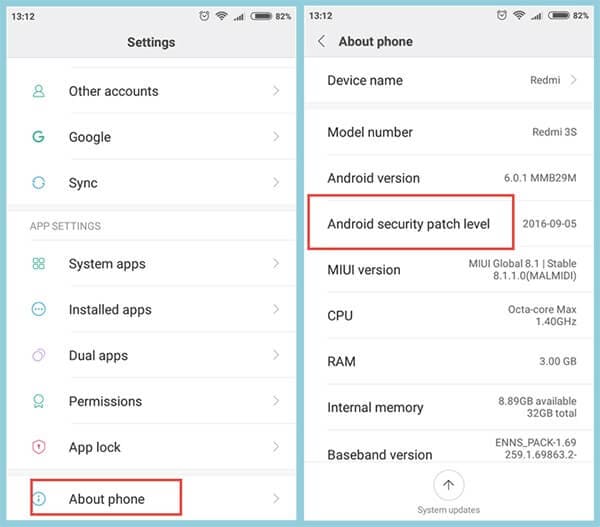
Note: Remember the date mentioned besides the “Android security patch level” is when it was first released. Please do not take it otherwise, that it is the date when you might have installed Google’s security patch.
2.1 For Android 6.0 and Above (New Security Patch) - AFTER March 5, 2017
If you own an Android device that runs on the Android OS version 6.0 or higher updated to “New Security Patch” released “AFTER March 5, 2017”. You need to follow the steps mentioned below.
First, you need to make sure that the Google Play Services app installed over your Apple iPhone 8 Plus is running on version 12.6.85 or lower. If that’s the case, you no longer require performing the lengthy steps below. Instead, directly skip stepping number 7 below.
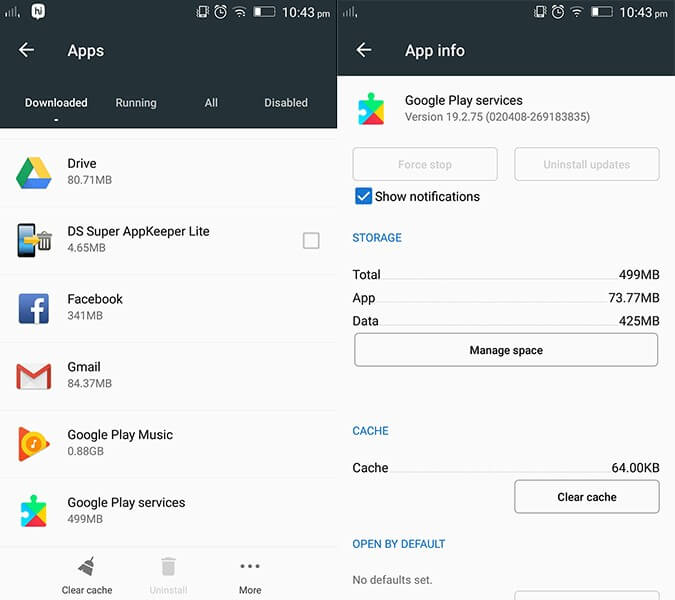
Note: To verify the Play Services version, launch “Settings” followed by selecting “Apps/Applications”. Scroll down to “Google Play Services” and hit on it. You will then see the app version at the top of the screen.

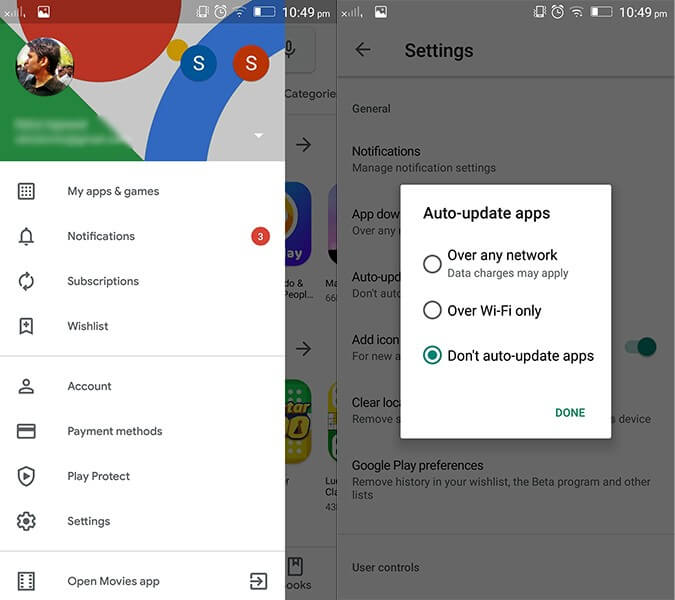
But if that’s not the case, you’re required to disable the Play Store’s auto-updates. For this, launch the Play Store and hit the “3 horizontal bars” at the top. Then, tap on “Settings” option from the appearing left panel followed by Auto-update apps available under “General” settings. Lastly, hit on the “Do not auto-update apps” option.
Next, get hold of Google Play Services (an older version) from the link here: https://www.apkmirror.com/apk/google-inc/google-play-services/google-play-services-12-6-85-release/
Note: Ensure to download the Google Play Services apk file that is closest to your Android version. But, remember not to install it now.
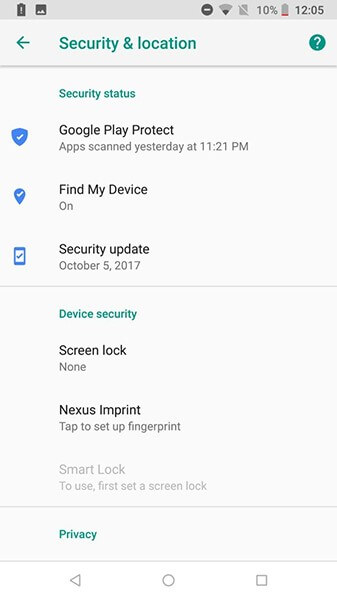
Once done, if “Find My Device” is enabled over your device, you need to get it disabled too. To do this, get into “Settings” followed by “Security & Location”. Now, hit on “Find my device” and toggle it off.
Likewise, disable “Google Play” and uninstall all its updates as well. To remove updates, get into “Settings” followed by “Apps/Applications”. Scroll down to “Google Play Services” and hit on “Uninstall updates”.
Note: If you’re unable to get this done, then you may need to disable the Android device manager in the first place. For this, get to “Settings” > “Security” > “Device Administrators” > disable “Android Device Manager first”.
Now is the time when you should install the Google Play Services apk (downloaded in step 3 above). Reboot your device afterwards.
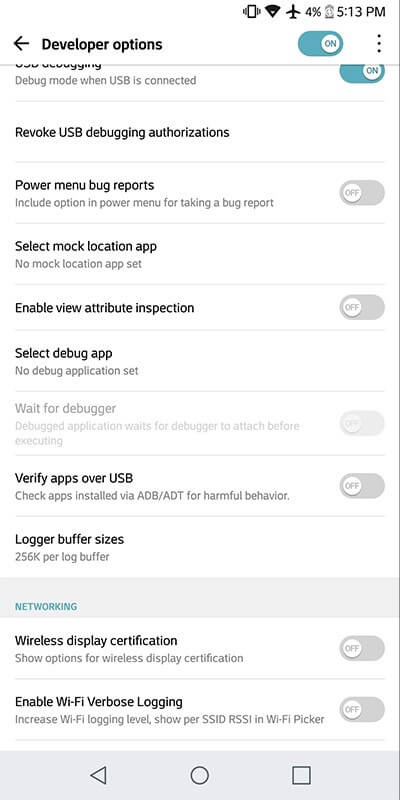
Subsequently, you need to again get into the “Settings” and then opt for “Developer Options”. Now, hit on “Select mock location app” and opt for “GPS JoyStick” here.
Lastly, launch the “GPS JoyStick app” and navigate to “Settings” followed by toggling on the “Enable Suspended Mocking” switch.

2.2 For Android 6.0 and Above (Old Security Patch) - BEFORE March 5, 2017
That was a detailed tutorial about the Android security patch level released “AFTER March 5, 2017”. But if your Android security patch level is before March 5, 2017, what would you have to do? Well, worry not, here is exactly what steps you need to follow to make use of the GPS joystick app to fake GPS location.
First, you need to navigate to the “Settings”. Then, opt for “Developer Options” and hit on “Select mock location app” followed by selecting the “GPS JoyStick” app here.

Lastly, launch the “GPS JoyStick app” to fake GPS location and navigate to “Settings”. Thereafter, toggle on the “Indirect Mocking” switch, and you’re done.

2.3 For Android 4 or 5
For the users of Android OS version 4 or Android OS version 5, there’s not much you need to do. Here is the exact method that you need to get through.
Get the “GPS JoyStick apk” installed over your device and then proceed to “Developer Options” available under the “Settings” menu. Then, hit on the “Select mock location app”.

Now, “GPS JoyStick app” to fake GPS location and get started with the FGL pro joystick control.
You will then have the FGL pro joystick control is visible on your Android screen. Thereafter, head back to the “Developer Options” and get the “Mock Locations” disabled.
Lastly, launch the “Pokemon GO” and you’re all set to fake GPS go with a joystick.
Part 3: How to bypass the blacklist of games like Pokemon GO
There are chances when you get caught by Pokemon Go for spoofing GPS location and get blocked/blacklisted for making use of fake GPS location apk. Here’s a workaround for bypassing the blacklist of games like Pokemon Go.
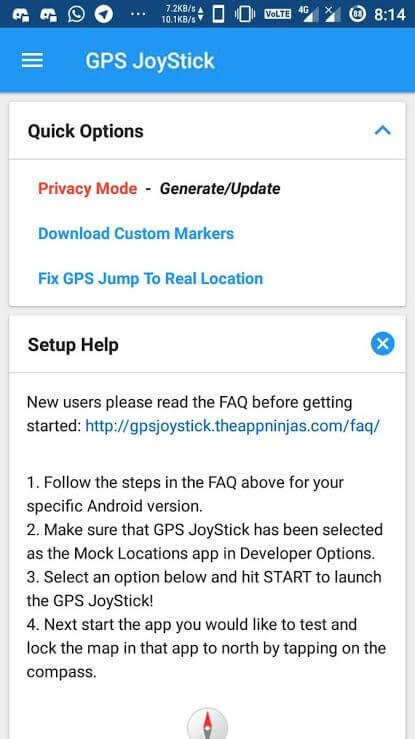
Download and then install the most recent version of GPS JoyStick apk. Now, launch it, and then hit on the “Privacy Mode” link available under the “Quick Options” section on the home screen. This will generate a unique copy of the app specifically for you.
Next, you need the generated app installed and get through with the setup process with the streak of steps listed below.
Now, you need to uninstall the original fake GPS joystick for Pokemon Go. Also, ensure that to uninstall every other spoofing/fake GPS apps that can potentially be on the Pokemon GO blacklist.
Thereafter, make use of the specifically generated GPS joystick on Pokemon Go to bypass the blacklist warning!
Lastly, utilize the “Update” button after hitting on the “Privacy Mode” link under the “Quick Options”. Then, navigate to the previously generated app from the appearing pop up. This will generate the update for it, and you’re all done.

Part 4: How to Use GPS Joystick to Fake Location on iPhone
When you fake GPS Joystick location, you can double the joy in playing location-based games like Pokemon go, Ingress, Zombies, Run, Geocaching, etc. All these games make use of the phone location, and it will be quite interesting if you move on with exciting places worldwide.
Do you want to fake GPS Joystick on iPhone?
Are you tired of searching for an effective GPS Joystick to fake location on the iPhone?
You would have ended up with a conclusion that there are no reliable and effective apps to fake location on the iPhone.
Dr. Fone’s specialist team presents Dr.Fone - Virtual Location for the gaming lovers to fake GPS Joystick on iPhone. You can now move the joystick to the desired location in no time using Dr.Fone.
Stepwise procedure to fake GPS with a joystick on iPhone
Step 1: Launch the app
After a successful download, install the app through the guiding wizard. Click the Dr.Fone app icon to explore its features. Using a USB cable, attach your Apple iPhone 8 Plus with your PC.
Step 2: Set a virtual location
On the first screen of Dr.Fone app, choose the ‘Virtual Location’ option.

Step 3: Modify the location address
Tap ‘Get Started’ option then add a new address in the ‘Teleport’ mode. To choose ‘Teleport’ mode, you have to select the first icon at the top-right screen. Next, enter the address at the top left side of the window. You can enter any address around the globe to fake GPS joystick location.
Step 4: Changed Location in the app
Now the Dr.Fone app displays your desired address as your current location. You can verify it by spotting the location on the map view.

Step 5: Location on iPhone
Next, you must check your default current location in map view on iPhone, and you will witness the modified location in pace with your desired address.

Step 6: Play Pokemon Go without moving
Now use the “one-stop route” or “multi-stop route” to simulate the real-world movement without moving. Just play Pokemon go to explore new Pokemons on different locations and gain more points through an effective fake GPS joystick location app Dr.Fone.
How To Use Special Features - Virtual Location On Apple iPhone 8 Plus?
Wondershare Dr.Fone - Virtual Location comes with multiple unique features that can be used to enhance the flow of spoofing location. With all these amazing features, you can easily change your iOS location without blinking an eye. Rather than making things complicated, Dr.Fone makes it easy for you to manage operations when you perform actions like changing Android locations.
Part 1: Circle Route (For Multi-Stop Route)
The circle route feature is under the multi-stop route mode. When your starting point is close to the ending point, a pop-up asks if you want to set up a circle route. Click Yes to create a circular path on the map.

Part 2: Realistic Mode (For One-Stop Route and Multi-Stop Route)
This particular feature makes the simulation look realistic with the ability to fluctuate the speed of the simulation. If you wish to turn on realistic mode for the one-stop or multi-stop route, look for the respective checkmark option in the panel on the left.

Part 3: Fluctuation Mode (For Teleport Mode)
Whenever you are teleporting your smartphone device to another location, you can try using the fluctuation mode feature offered against it. As you activate Teleport Mode from the top-right section and search for a location, you will discover the Fluctuation Mode toggle in the confirmation tab. Turn on the toggle to slightly switch the location from the selected point to show realistic motion.

Part 4: Cooldown Timer (For Teleport Mode and Jump Teleport Mode)
While teleporting the location of your smartphone to different places for playing games like Pokemon Go, you are bound to activate a cooldown timer within your location-changing app to show realistic movement. By locating the Cooldown Timer on the right pane of icons, activate it, and this feature will automatically calculate the cooling time by measuring the distance between your destination and the starting point.

It is recommended not to start the movement until the cooldown time is completed to avoid unnecessary bans. Moreover, you can also activate the Auto jump after cooldown in the Jump teleport mode after turning on the Cooldown Timer.
This option will automatically jump you to the next destination once the timer ends. It is helpful for games like Pokemon Go, where the game servers can detect frequent jumps with no cooldown time.
Part 5: Import/Export GPX File
You can also import and export specific navigated locations from Dr.Fone in the form of GPX files. While you can export GPX files for keeping a record of your location, you can also import such files for inserting specific locations to simulate or teleport to. Find out how you can import and export GPX files with this location-changing application:
Step 1Export the GPX File
If you have defined a proper location to simulate at a particular instant using Dr.Fone - Virtual Location, you can have this location exported by clicking the Export icon on the top of the left panel. This will open a window where you can set the location for saving the GPX file.

Step 2Import a GPX File
For importing a GPX file on the platform, click the Import button on the right pane. As this opens a window, select the GPX file you wish to import to the platform.

Step 3Wait for the File to be Read
Wait for a moment until Dr.Fone - Virtual Location recognizes the specific locations within the GPX file and displays them on the map.

Part 6: Historical Records
If you want to use a similar track record on your smartphone again, you can access the historical records saved on the platform for easy access.
Step 1Open Historical Records
Click the Historical Records button on the right pane to access the entire history involving the connected smartphone and the location spoofing platform.

Step 2Access Any Location from the History
Select the Go button adjacent to any particular historical record to re-launch a similar simulation for the Apple iPhone 8 Plus device. You can also click Clear All to delete all historical records.

Part 7: Favorite List
You can also set up favorite locations within the platform to define quick accessibility to your favorite locations. To do that, you have to follow the guidelines shown next:
Step 1Favorite Specific Locations
While setting up locations in Jump Teleport Mode, One-Stop Route, or Multi-Stop Route, you can tap on the Favorite icon adjacent to every marked location or favorite an entire route with the Favorite icon on the top of the left panel.

Step 2Access your Favorite Section
To look for your favorite locations, look for the Favorite icon on the right pane to open a list containing all locations you have marked. You can choose the Move option to automatically move into a particular location in no time.

Also read:
- [New] 2024 Approved How to Schedule Meetings on Zoom [Web/Desktop/Mobile]
- [New] In 2024, The Cryptic Collection of 2023 Auction for Anonymity Artifacts
- [Updated] Expert Choices Best Mics Enhancing 4K Video Quality
- 11 Best Location Changers for Nokia C12 Pro | Dr.fone
- 3uTools Virtual Location Not Working On Apple iPhone 13 mini? Fix Now | Dr.fone
- 4 Methods to Turn off Life 360 On Apple iPhone 13 Pro Max without Anyone Knowing | Dr.fone
- 5 Easy Ways to Change Location on YouTube TV On Nubia Z50 Ultra | Dr.fone
- 5 Hassle-Free Solutions to Fake Location on Find My Friends Of Apple iPhone 15 Pro Max | Dr.fone
- 5 Hassle-Free Solutions to Fake Location on Find My Friends Of Infinix Note 30 VIP Racing Edition | Dr.fone
- 6 Ways to Change Spotify Location On Your Tecno Spark 20 | Dr.fone
- 9 Solutions to Fix Process System Isnt Responding Error on Vivo Y200 | Dr.fone
- A Detailed VPNa Fake GPS Location Free Review On Nokia XR21 | Dr.fone
- Brighten Your Surroundings with 21+ Collage Wonders for 2024
- How To Activate and Use Life360 Ghost Mode On OnePlus Ace 2V | Dr.fone
- Soluções Eficazes Para Envios De Arquivos Gigantes via Correio Eletrônico - Três Abordagens Únicas
- Troubleshooting a Malfunctioning Dell Wireless Keyboard - Expert Guidance
- Ultimate Selection: The Premier Sunlight-Powered Charger Models of 2# Maximizing Portability and Efficiency 'S Leading Solar Chargers
- Title: 3 Ways to Change Location on Facebook Marketplace for Apple iPhone 8 Plus | Dr.fone
- Author: Mia
- Created at : 2024-12-21 03:45:37
- Updated at : 2024-12-25 05:19:31
- Link: https://location-fake.techidaily.com/3-ways-to-change-location-on-facebook-marketplace-for-apple-iphone-8-plus-drfone-by-drfone-virtual-ios/
- License: This work is licensed under CC BY-NC-SA 4.0.